Saturday 22 July 2023

Sitecore Publishing Service 7.0 Installation Guide

 About the Publishing Service module

The Publishing Service module is an optional replacement for the existing Sitecore publishing methods. This module increases publishing throughput, reduces the amount of time spent publishing large volumes of items, and offers greater data consistency and reliability. The module also improves the user experience and provides better visual feedback to the user on the state of the publishing system.


The Publishing Service does not use any of the features, pipelines, and settings in the current publishing system. It is an entirely new way of publishing Sitecore items and media.


Sitecore Publishing Service requirements

The prerequisites for the Sitecore Publishing Service 7.0 release are:

• .NET Runtime 6.0.10

• Windows Server Hosting (.NET 6.0)

Before you start the installation of the Sitecore Publishing Service, ensure you have all the prerequisites in place. Once you have met the requirements in your system, follow the steps below to install the Sitecore Publishing Service manually:


Step-1: Download the Sitecore Publishing Service package from the Sitecore Downloads page


Step-2: Extract the content of the archive(Sitecore Publishing Service 7.0.20 rev. 0020-net6.0.zip) to a folder of your choice. For example:

C:\inetpub\wwwroot\sitecorepublishing

Step-3: Create a new sitecoreruntime folder in the installation folder. For example:


C:\inetpub\wwwroot\sitecorepublishing\sitecoreruntime

Step-4: Copy the Sitecore license file to the sitecoreruntime folder

Step-5: Copy the item resource files from the CM Sitecore instance (for Sitecore 10.1 and higher). Copy dat-files for all databases except the Core preserving the
folder structure. 

For example, from C:\inetpub\wwwroot\sitecore\App_Data\items to C:\inetpub\wwwroot\sitecorepublishing\sitecoreruntime\items\sitecore and
C:\inetpub\wwwroot\sitecore\sitecore modules\items to
C:\inetpub\wwwroot\sitecorepublishing\sitecoreruntime\items\modules


Step-6: In IIS, create a new site pointing to the installation folder.

Setp-7: Start the IIS Manager and in the Connections panel, expand Sites. Right-click Sites and then click Add Website.


Step-8: In the Add Website dialog, fill in the required fields.


NOTE: If you add a custom host name, you must update your hosts file (C:\Windows\System32\drivers\etc\).

Step-9: In the IIS Manager, right-click the application pool for your created website, then click Basic Settings.

Step-10: In the Edit Application Pool dialog, in the .NET CLR version field, select >No Managed Code.


NOTE: The Application Pool user must have Read, Execute, and Write permissions to the site’s physical path.

Step-11: In the IIS Manager, right-click the application pool for the website that you created, and then click Advanced Settings.

Step-12: In the Advanced Settings dialog, in the IdleTime-out (minutes) field, enter 0.

Step-13: Configure the core, master, web, and service connection strings for the service along with any additional configuration values


SetConnectionString command

To set or change a connection in a configuration file, use the SetConnectionString command.

1. Core DB:
.\Sitecore.Framework.Publishing.Host.exe configuration SetConnectionString core 'Data Source=DESKTOP-5EUPI;Initial Catalog=sitecore103_Core;Integrated Security=False;User ID=sa;Password=Test@123;MultipleActiveResultSets=True'

2. Master DB:
.\Sitecore.Framework.Publishing.Host.exe configuration SetConnectionString master 'Data Source=DESKTOP-5EUPI;Initial Catalog=sitecore103_Master;Integrated Security=False;User ID=sa;Password=Test@123;MultipleActiveResultSets=True'

3. Web DB:
.\Sitecore.Framework.Publishing.Host.exe configuration SetConnectionString web 'Data Source=DESKTOP-5EUPI;Initial Catalog=sitecore103_Web;Integrated Security=False;User ID=sa;Password=Test@123;MultipleActiveResultSets=True'

NOTE: Depending on which Sitecore version you are using, consider disabling the multiple-link database mode described in the Sitecore Publishing Service Module installation guide available on the Sitecore download page.

Step-14: To upgrade the database schema, run the schema upgrade command from the extracted folder:

Sitecore.Framework.Publishing.Host.exe schema upgrade --force

Step-15: To access your website, enter http://<sitename>/api/publishing/operations/status in your browser. If you receive a value of { "status" : 0, “statusType”: “Ok” }, the application is installed correctly. If you receive any other value, check the application logs for further details.


The configuration of the Host Service has been completed. Now Install the Sitecore Publishing Service module on your Sitecore Instance. Once this is installed, from the Launchpad you will see the Publishing Icon. But before clicking on the Publishing Icon, you need to specify the link between the Host Service and the Publishing Module. To do so, create a new configuration file and name it z.PublishingService.config. In the config file, paste the setting for the link as shown below:


<configuration xmlns:patch="http://www.sitecore.net/xmlconfig/">
    <sitecore>
        <settings>
            <setting name="PublishingService.UrlRoot" value="http://sitecore.publishing/"></setting>
            </settings>
        </sitecore>
</configuration>

Place this configuration file in the path ‘Website/App_Config/Include/‘. Reload your Sitecore Instance and click on the publishing icon to navigate to the Publishing Dashboard.


This is the Publishing Dashboard, where you see the Active, Queued, and Recent Jobs.
Active jobs – the publishing jobs that are currently being published. 
Queued jobs – the publishing jobs that are waiting to be published. 
Recent jobs – the most recent publishing jobs that have been processed.


If no errors are shown, then the module has been installed properly. This module will now override the default publishing manager.


Thursday 22 September 2022

Sitecore Lowercase URLs


As a best practice, it is recommended to use only lowercase URLs on your website. This can be achieved by setting the lowercaseUrls attribute of the LinkManager provider in the Sitecore.

For Sitecore 9 and lower version

The default link provider is Sitecore. If you have implemented the custom link provide, set the value of the default provider accordingly:

<?xml version="1.0"?>

<configuration xmlns:patch="http://www.sitecore.net/xmlconfig/">

  <sitecore>

    <linkManager defaultProvider="sitecore">

      <providers>

        <add name="sitecore">

          <patch:attribute name="lowercaseUrls">true

          </patch:attribute>

        </add>

      </providers>

    </linkManager>

  </sitecore>

</configuration>

For Sitecore 9.1 and above version

The default link provider is Sitecore. Sitecore 9.1 introduced urlBuilder used for building items URL. The following config works for Sitecore 9.1 and above.

<?xml version="1.0"?>

<configuration xmlns:patch="http://www.sitecore.net/xmlconfig/">

  <sitecore>

    <links>

      <urlBuilder>

        <lowercaseUrls>true</lowercaseUrls>

      </urlBuilder>

    </links>

  </sitecore>

</configuration>


Wednesday 25 May 2022

Deactivate the Sitecore Publishing Service


Sitecore Publishing Service (SPS) is a great module designed by Sitecore. The SPS module Provides a lot of increase in the publishing performance. You may read my previous post on how to install Sitecore Publishing Service.

How to disable to Sitecore Publishing service and switch back to the default publishing process?

After the Sitecore Publishing Service (SPS) module has been installed, If you want to revert to the default publishing process then follow these steps.

  1. Locate the Sitecore.Publishing.Service.*.config files and change the file extension to .disabled. The files can be found in the following folders:

    1. Sitecore XP 9.X: the /App_Config/Modules/PublishingService folder.

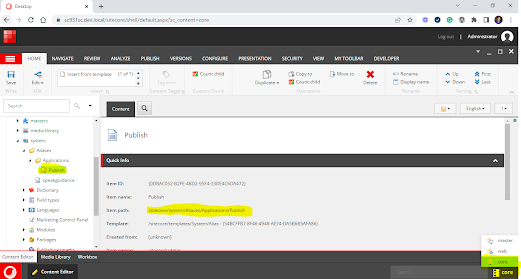
  2. Switch to the Core database and rename the
    /Sitecore/system/Aliases/Applications/Publish item to PublishDisabled.


Once changes are done then you will be able to do the default publishing process. Now you can select any item or publish the site with the default publishing process.


Note: To active the Sitecore Publishing Service module, revert the changes that you have made.

Reference: Revert to default publishing after installing the Sitecore Publishing Service module


  1. how to install Sitecore Publishing Service.
  2. While installing Sitecore Publishing Service, Get the error about "DotNet Core Library".


Sunday 22 May 2022

Sitecore Publishing Service 4.3.0 Setup Error With DotNet Core Library

Recently I was trying to set Sitecore Publishing Service 4.3.0 with Sitecore 9.3.

While trying to set up the Publishing Service manually, and did all the steps described in the documentation. After those, I tried to visit the site using the following URL to verify the solution.

http://sitecorepublishing/api/publishing/operations/status


Application startup exception: System.Reflection.TargetInvocationException: Exception has been thrown by the target of an invocation. ---> System.IO.FileLoadException: Could not load file or assembly 'Serilog.AspNetCore, Version=2.0.0.0, Culture=neutral, PublicKeyToken=24c2f752a8e58a10' or one of its dependencies. Operation is not supported. (Exception from HRESULT: 0x80131515) ---> System.NotSupportedException: An attempt was made to load an assembly from a network location which would have caused the assembly to be sandboxed in previous versions of the .NET Framework. This release of the .NET Framework does not enable CAS policy by default, so this load may be dangerous. If this load is not intended to sandbox the assembly, please enable the loadFromRemoteSources switch. See http://go.microsoft.com/fwlink/?LinkId=155569 for more information.

   --- End of inner exception stack trace ---

   at System.Reflection.RuntimeAssembly._nLoad(AssemblyName fileName, String codeBase, Evidence assemblySecurity, RuntimeAssembly locationHint, StackCrawlMark& stackMark, IntPtr pPrivHostBinder, Boolean throwOnFileNotFound, Boolean forIntrospection, Boolean suppressSecurityChecks)

   at System.Reflection.RuntimeAssembly.InternalLoadAssemblyName(AssemblyName assemblyRef, Evidence assemblySecurity, RuntimeAssembly reqAssembly, StackCrawlMark& stackMark, IntPtr pPrivHostBinder, Boolean throwOnFileNotFound, Boolean forIntrospection, Boolean suppressSecurityChecks)

   at System.Reflection.Assembly.Load(AssemblyName assemblyRef)

   at Serilog.Settings.Configuration.ConfigurationReader.LoadConfigurationAssemblies()

   at Serilog.Settings.Configuration.ConfigurationReader..ctor(IConfigurationSection configuration, DependencyContext dependencyContext)

   --- End of inner exception stack trace ---

   at System.RuntimeMethodHandle.InvokeMethod(Object target, Object[] arguments, Signature sig, Boolean constructor)

   at System.Reflection.RuntimeConstructorInfo.Invoke(BindingFlags invokeAttr, Binder binder, Object[] parameters, CultureInfo culture)

   at System.RuntimeType.CreateInstanceImpl(BindingFlags bindingAttr, Binder binder, Object[] args, CultureInfo culture, Object[] activationAttributes, StackCrawlMark& stackMark)

   at System.Activator.CreateInstance(Type type, BindingFlags bindingAttr, Binder binder, Object[] args, CultureInfo culture, Object[] activationAttributes)

   at System.Activator.CreateInstance(Type type, BindingFlags bindingAttr, Binder binder, Object[] args, CultureInfo culture)

   at Sitecore.Framework.Publishing.Host.SerilogExtensions.SerilogConfigurationSection(LoggerSettingsConfiguration settingConfiguration, IConfigurationSection configuration, DependencyContext dependencyContext)

   at Sitecore.Framework.Publishing.Host.Startup.ConfigureLogging(ILoggingBuilder loggingBuilder)

   at Microsoft.Extensions.DependencyInjection.LoggingServiceCollectionExtensions.AddLogging(IServiceCollection services, Action`1 configure)

   at Sitecore.Framework.Publishing.Host.Startup.ConfigureServices(IServiceCollection services)

--- End of stack trace from previous location where exception was thrown ---

   at System.Runtime.ExceptionServices.ExceptionDispatchInfo.Throw()

   at Microsoft.AspNetCore.Hosting.ConventionBasedStartup.ConfigureServices(IServiceCollection services)

   at Microsoft.AspNetCore.Hosting.Internal.WebHost.EnsureApplicationServices()

   at Microsoft.AspNetCore.Hosting.Internal.WebHost.BuildApplication()

Press Ctrl+C to shut down.


The error was complaining about "Serilog.AspNetCore.dll" which comes with the Publishing service installation.

Solution: I open the properties of  "Serilog.AspNetCore.dll"  and click the "Unlock" button in the popup window.


Then, Sitecore Publishing Service start to work as expected.


How to install Sitecore Publishing Service - Quick Guide.


Sitecore Publishing Service - Quick Guide

Sitecore Publishing Service

The Sitecore Publishing Service (SPS) module integrates with the opt-in Publishing Service, supporting high-performance publishing in large-scale Sitecore setups. The Publishing Service module is an optional replacement for the existing Sitecore publishing methods. This module increases publishing throughput, reduces the amount of time spent publishing large volumes of items, and offers greater data consistency and reliability. The module also improves the user experience and provides better visual feedback to the user on the state of the publishing system.


Publishing Module

The Sitecore Publishing Module is distributed as a standard Sitecore package.

Installation Guide.

Check Compatibility Table for SPS: Sitecore Publishing Service – compatibility tables

I am installing Sitecore Publishing Service 4.3.0 for Sitecore 9.3 version.

Download these two zip files.

  1. Sitecore Publishing Service: Sitecore Publishing Service
  2. Sitecore Publishing Service Module: Sitecore Publishing Service Module
The SPS module comes in 2 parts. The hosting service and the Sitecore package.

Manual Installation

  1. Extract the Sitecore Publishing Service to a folder of your choice. For example: C:\inetpub\wwwroot\sitecorepublishing
  2. In IIS, create a new site pointing to the folder 
  3. Start the IIS Manager and in the Connections panel, expand Sites. Right-click Sites and then click Add Website.
  4. In the Add Website dialog, fill in the required fields


  5. In the IIS Manager, right-click the application pool for the website that you created, and then click Basic Settings.
  6. In the Edit Application Pool dialog, in the .NET CLR version field, select No Managed 
    Code.

    Add in your host file the domain along with the respective IP address as follows:

    127.0.0.1   sitecorepublishing

You need to update the connection strings of the Sitecore Instance you want to use. For example, I have a Sitecore instance name sc931. So, I go to the website/App_Config folder and edit the ConnectionStrings.config by adding the attribute ‘MultipleActiveResultSets=True’ to the Core, Master, and Web databases.

Core

connectionString=”user id={userId};password={Password};Data Source={Datasource};Database=sc931_Core;MultipleActiveResultSets=True;“

Master

connectionString=”user id={userId};password={Password};Data Source={Datasource};Database=sc931_Master;MultipleActiveResultSets=True;“

Web

connectionString=”user id={userId};password={Password};Data Source={Datasource};Database=sc931_Web;MultipleActiveResultSets=True;“


Once this is completed, we need to make the Host Service access the database of the Sitecore Instance. Go to path C:\inetpub\wwwroot\sitecorepublishing\config\global and create a file name sc.connectionstring.xml and paste the following connections in it. 


The above connection string will allow the Host service to get access to the databases of the Sitecore Instance. When upgrading the database schema. Please see the following steps for the creation and up-gradation of the databases:

  1. Open the Command Prompt with Admin rights.
  2. Navigate to the directory of the publishing host service.Example: cd  C:\inetpub\wwwroot\sitecorepublishing
  3. Run the command
    Sitecore.Framework.Publishing.Host.exe schema list
    Sitecore.Framework.Publishing.Host.exe schema upgrade --force
To see if the Host Service has been installed and configured correctly, go to the following URL http://{site url}/api/publishing/operations/status and we need to have a response of {“status”:0}. If you receive any other value, check the application logs for further details. All logs files are here C:\inetpub\wwwroot\sitecorepublishing\logs.

Note: If you are not able to see any logs file then go to web.config file and change the value of "stdoutLogEnabled" to "True".
<aspNetCore processPath=".\Sitecore.Framework.Publishing.Host.exe" arguments="" stdoutLogEnabled="true" stdoutLogFile=".\logs\stdout" forwardWindowsAuthToken="false" />


The configuration of the Host Service has been completed. Now Install the Sitecore Publishing Service module on your Sitecore Instance. Once this is installed, from the Launchpad you will see the Publishing Icon. But before clicking on the Publishing Icon, you need to specify the link between the Host Service and the Publishing Module. To do so, create a new configuration file and name it z.PublishingService.config. In the config file, paste the setting for the link as shown below:

<configuration xmlns:patch="http://www.sitecore.net/xmlconfig/">
    <sitecore>
        <settings>
            <setting name="PublishingService.UrlRoot" value="http://sitecorepublishing/"></setting>
            </settings>
        </sitecore>
</configuration>

Place the configuration file to the path ‘Website/App_Config/Include/‘. Reload your Sitecore Instance and click on the publishing icon to navigate to the Publishing Dashboard.


This is the Publishing Dashboard, where you see the Active, Queued, and Recent Jobs.


Thursday 23 December 2021

Sitecore 10 Content Serialization using Command Line Interface

Introduction

Sitecore Content Serialization (SCS) is a system for serializing, sharing, and deploying content items, as well as keeping them in version control. This is helpful for developers that work on the same project to synchronize the Sitecore changes between their individual development environments.


Sitecore Content Serialization (SCS) comes with two options.

  • Sitecore Command Line Interface
  • Sitecore for Visual Studio
Sitecore CLI is free it can be accessed via PowerShell whereas Sitecore for Visual Studio is a plugin/extension kind for Visual Studio and needs a separate license.


Install Sitecore Management Service

You must install the Sitecore Management Service package to your CM instance and you can download the package from the Sitecore CLI Download page and directly install this package to Sitecore Instance. The usual Sitecore->Control Panel->Administration->Install a package.


Once the Sitecore Management Service is installed, then need to install Sitecore CLI.

Install Sitecore Command Line Interface (CLI)

The Sitecore Command Line Interface (CLI) allows console communication with a Sitecore instance.

The Sitecore CLI requires that .NET Core is installed on your workstation. Please download and install the .NET Core 3.1 from Microsoft.

Please note that the command required “dotnet new tool-manifest” is available in .NET Core 3+ version but not in older versions.
  1. Open PowerShell in admin mode and go to your Project Solution Root directory.
  2. Use the below command to install the Sitecore CLI tool.
  • dotnet new tool-manifest
  • dotnet tool install Sitecore.CLI --add-source https://sitecore.myget.org/F/sc-packages/api/v3/index.json
  • # To install the Sitecore CLI as a global tool (not recommended):
  • dotnet tool install Sitecore.CLI -g --add-source https://sitecore.myget.org/F/sc-packages/api/v3/index.json

Install Sitecore CLI Commands

After successful installation, you can verify it using
"dotnet sitecore"
because as per the Sitecore installation document, you have to hit only
"sitecore"
but it throws an error.

Login to Sitecore Instance with SCLI Interface

There are two ways to login into Sitecore using SCLI-
  1. An interactive user login, using device code flow.
  2. A non-interactive client login, using client credentials flow.
Interactive User Login

Before logging into Sitecore, we have to initialize SCLI as mentioned below:
  • Open the Powershell in administrator mode and go to the Project Folder and run the following command-
"dotnet sitecore init"

  • As you hit this command in the file system, you can see the sitecore.json file and .sitecore folder.


  • Now, login into Sitecore and run this command (change the parameters accordingly)-
"dotnet sitecore login --auth https://sc10identityserver.dev.local --cm https://sc10sc.dev.local --allow-write true"
  • Once you hit this command, a Sitecore login window will start opening in your browser and click Yes, Allow and close the browser.


  • Now create a file under your project folder "1.Media.Module.json" in my case and add the following details:


We instruct Sitecore CLI to look for “ModuleName.module.json” for sitecore items path for serializing.

Reason we pick up .module.json is because in Sitecore.json config which is created under project root path is instructed to be found in .module.json files.

  • Remember, if you are adding multiple paths then do have the templates on the top else you will get an error while deserialization.

    • After setting all this, use the below serialization command for the push & pull activities where ‘ser’ is the shorthand for the serialization keyword. After running the pull command, you can see the YML files in a file system.

    "dotnet sitecore ser pull"
    "dotnet sitecore ser push"


You can see the items serialized to a YML file available under /serialization folder. Sitecore CLI creates a serialization folder in the same level as of Media.module.json which has the serialized items in YML format for the corresponding module.json configurations.


These YML files contains information about the sitecore contents and can be maintained in any version control just like code files.
  • You must run this command before you start making any changes to your items in your local instance. This will automatically serialize your items to file system. Run the below command to enable transparent sync
    "dotnet sitecore ser watch"

  • For other commands or the help section, run the command as mentioned below:
    "dotnet sitecore --help"

Found some issues while installing


Solution: Need to install Netget in the project solution.


Sitecore Publishing Service 7.0 Installation Guide

  About the Publishing Service module The Publishing Service module is an optional replacement for the existing Sitecore publishing methods....