Wednesday, 31 July 2019

How to Create Custom Standard Values Tokens


Out of the box, Sitecore comes with the following expand standard values tokens:

$name – Name of the item
$date – Current server date
$time – Current server time
$now – Current server date time
$id – Item ID
$parentid – Item’s Parent ID
$parentname – Item’s Parent Name

Sometimes the already existing tokens are not enough. There are cases in which the Content Editors won`t be able to access the value that needs to be populated (ex. – web service call) or it will be hard for them to do it (ex. – the value of the item varies on many other items). In the current example, the $next token will be implemented. It will automatically replace the token with the current siblings' count plus one  – this token is usually used in cases where there is a requirement for the auto-incrementing sort order of items.

Implementing a custom token is fairly simple and can be achieved in 2 easy steps.

Step 1 – Creating a custom ExpandInitialFieldValueProcessor

Create a custom ExpandInitialFieldValueProcessor with the following code.

using System;
using System.Collections.Generic;
using System.Linq;
using System.Web;
using Sitecore.Pipelines.ExpandInitialFieldValue;

namespace SitecoreMaster82.Models.CustomToken
{
    public class TokenNextProcessor : ExpandInitialFieldValueProcessor
    {
        public override void Process(ExpandInitialFieldValueArgs args)
        {
            if (args.SourceField.Value.Contains("$next"))
            {
                if (args.TargetItem != null && args.TargetItem.Parent != null && args.TargetItem.Children != null)
                {
                    args.Result = args.Result.Replace("$next", args.TargetItem.Parent.Children.Count.ToString());
                }
                else
                {
                    args.Result = args.Result.Replace("$next", "0");
                }
            }
        }
    }
}

The code is pretty straightforward. It checks if the value of the field contains the $next token. If it does it checks if the parent is not null and the parent has children. If the parent is not null and there are children the value is set to the children`s count (the processor is executed after the child is added to the index will be 1 based), otherwise it sets the value to 0.

Step 2 – Creating the custom configuration

<?xml version="1.0" encoding="utf-8" ?>
<configuration xmlns:patch="http://www.sitecore.net/xmlconfig/">
  <sitecore>
    <pipelines>
      <expandInitialFieldValue>
        <processor type="SitecoreMaster82.Models.CustomToken.TokenNextProcessor , SitecoreMaster82"
       patch:after="processor[@type='type=Sitecore.Pipelines.ExpandInitialFieldValue.ReplaceVariables, Sitecore.Kernel']" />
      </expandInitialFieldValue>
    </pipelines>
  </sitecore>
</configuration>

And here is an example of how it works.


Wednesday, 3 July 2019

Navigate to Content Tree, Items Search by ID and Path


Navigate to the Item, Search by Path and Item ID


Lack of a fast way to paste a Sitecore item path into the UI and have the Content Editor change selection to that item. I suggested using the search box or the Navigate button, but apparently, they weren’t right. The person wanted to paste a link and have the content tree change without any other clicking about.


The problem can be solved with a simple Command:


using Sitecore;
using Sitecore.Data;
using Sitecore.Data.Items;
using Sitecore.Shell.Framework.Commands;
using Sitecore.Web.UI.Sheer;

namespace SitecoreMaster.Models
{
    public class NavigateCommand: Command
    {
        public override void Execute(CommandContext context)
        {
            ClientPipelineArgs args = new ClientPipelineArgs();
            args.CustomData.Add("db", context.Items[0].Database.Name);

            Context.ClientPage.Start(this, "Run", args);
        }

        protected void Run(ClientPipelineArgs args)
        {
            if (!args.IsPostBack)
            {
                SheerResponse.Input("Enter a path or id: ", string.Empty);
                args.WaitForPostBack();
            }
            else
            {
                if (args.HasResult)
                {
                    string dbName = (string)args.CustomData["db"];
                    Database db = Sitecore.Configuration.Factory.GetDatabase(dbName);
                    Item itm = db.GetItem(args.Result);

                    if (itm != null)
                    {
                        Context.ClientPage.SendMessage(this, string.Format("item:load(id={0})", itm.ID.ToString()));
                    }
                    else
                    {
                        SheerResponse.ShowError("Item not found", string.Format("The item '{0}' was not found.", args.Result));
                    }
                }
            }
        }
    }

}


When the command is triggered by clicking a button, the code records the database that the context item was found in. (That’s whatever item was selected in the content tree when the user clicked the button triggering our command) The “context” database for commands is always Core, so we need this information because the user might actually be looking at Master or Web when they click the button. This is then passed into the Run() method.


The first time Run() is triggered no postback has occurred, so we need to ask the user to enter the path or ID of the item to select, and we need to wait for that data. The SheerResponse.Input() method shows a simple dialog with a text entry field. If you were feeling fancy you could create a custom dialog using Sheer here, but this basic dialog will do for our needs.


The second time Run() is triggered the postback from the input dialog should have occurred. If it has, and if the postback has provided us with some data, then we can try and make the Content Tree change focus. To do that we want to load the item to verify it exists. That means extracting the database name from the arguments passed in, fetching a reference to the database and then trying to load the item.


If we get an item back from the database, we can use the SendMessage() method to trigger the “load an item” behaviour. This will cause the Content Editor to load the item specified, refresh the content tree so it has focus, and refresh the editor pane to show the appropriate data. And if we get no item back we can show an error using the ShowError()method


To enable the user to trigger our command we need to wire it up using the same old techniques we’ve used for commands in the past. First, you have to map the class above to a command string by adding an entry to the Commands.config file with a patch


<configuration xmlns:patch="http://www.sitecore.net/xmlconfig/">
  <sitecore>
    <commands>
      <command name="ContentTreenavigate:navigate" type="SitecoreMaster.Models.NavigateCommand,SitecoreMaster" />
    </commands>
  </sitecore>
</configuration>

(Obviously, you need your namespace and dll name in the type attribute above…


Then you need to create a button in the UI to trigger this command. For example, to add it to the “Go to” chunk of the Developer ribbon tab, you can add a new item at /sitecore/content/Applications/Content Editor/Ribbons/Chunks/Goto in the Core database. Using the /sitecore/templates/System/Ribbon/Small Button template add something like:


Choose a suitable icon, fill in the click event with the command name defined above, and give it whatever name you fancy.


So to test it, switch back to Master and click your new button:

If you enter the path "/sitecore/content/Website/Command Template Item/2019/6/New NewsItem"  and click ok, the content tree will change:


If you enter the Item ID "{8E080626-DDC3-4EF4-A1D1-F0BE4A200254}" and click ok, the content tree will change:


Conclusion
Finally, I would like to conclude this post, I hope I have been able to help you and justify the topic.


Tuesday, 2 July 2019

Example of Sitecore Command Template With User Interface


Command Template: allow insert of items according to logic rather than predefined structures.


The command template defines a class and method to be called during an insert operation. Unlike data templates and branch templates, which consist of predefined structures, command templates reference Sitecore UI commands to invoke wizards or other logic used to create new items.


Step 1: Writing our Command
Create our Command Class in your solution and inherit Command Class. Command Class is available in Sitecore.Shell.Framework.Commands namespace in Sitecore.Kernel.dll

using Sitecore;
using Sitecore.Data;
using Sitecore.Data.Items;
using Sitecore.Globalization;
using Sitecore.Shell.Framework.Commands;
using Sitecore.Web.UI.Sheer;
using System;
using System.Collections.Specialized;

namespace SitecoreMaster82.Models.CommandTemplate
{
    public class CustomCommandTemplate : Command
    {
        public override void Execute(CommandContext context)
        {
            if (context.Items.Length == 1)
            {
                Item item = context.Items[0];
                NameValueCollection parameters = new NameValueCollection();
                parameters["id"] = item.ID.ToString();
                parameters["language"] = item.Language.ToString();
                parameters["database"] = item.Database.Name;
                Context.ClientPage.Start(this, "Run", parameters);
            }
        }

        protected void Run(ClientPipelineArgs args)
        {
            if (!args.IsPostBack)
            {
                //Means we are in the initial step, we want to ask for the name of the news
                Context.ClientPage.ClientResponse.Input("Enter the name of the news item:", Translate.Text("New NewsItem"), Sitecore.Configuration.Settings.ItemNameValidation, "'$Input' is not a valid name.", 100);
                args.WaitForPostBack();
            }
            else
            {
                //Now we got a postback, which means we got a response
                if (!String.IsNullOrEmpty(args.Result) && args.Result != "undefined")
{
                    Database db = Sitecore.Configuration.Factory.GetDatabase(args.Parameters["database"]);
                    Item parent = db.GetItem(args.Parameters["id"], Language.Parse(args.Parameters["language"]));
                    //Create the folder structure if it doesn't exist
                    string year = DateTime.Now.Year.ToString();
                    string month = DateTime.Now.Month.ToString();
                    TemplateItem folderTemplate = db.Templates[TemplateIDs.Folder];
                    Item yearFolder = parent.Children[year];
                    if (yearFolder == null)
                        yearFolder = parent.Add(year, folderTemplate);
                    Item monthFolder = yearFolder.Children[month];
                    if (monthFolder == null)
                        monthFolder = yearFolder.Add(month, folderTemplate);
                    //Create the news Item
                    TemplateItem template = Context.ContentDatabase.Templates[new ID("{5401DFB9-D884-418A-8EB2-1CCC3931F6EE}")]; //This GUID is of data templates based on you want to create item /sitecore/templates/User Defined/News 
                    Item item = monthFolder.Add(args.Result, template);
                    //Load the Item in the content editor
                    Context.ClientPage.SendMessage(this, "item:load(id=" + item.ID.ToString() + ")");
                }
            }
        }
    }
}

Step 2: Add Command in your Commands.config file
<configuration xmlns:patch="http://www.sitecore.net/xmlconfig/">
  <sitecore>
    <commands>
      <command name="CommandTemplate:TestCommandTemplate" type="SitecoreMaster82.Models.CommandTemplate.CustomCommandTemplate,SitecoreMaster82" />
    </commands>
  </sitecore>
</configuration>
Step 3: Add Command Template Item
  • Right Click on Branches and select Command Template
  • Give our Command Template a proper Name


    • Now add command Name to our Command Template
    • Keep in mind that Command_Name would be the same name used in a command.config file
    • That’s it our Command Template is ready to use, we just need to add it in Insert Options and its done. Whenever we will add new Items using this Command Template it will automatically create our Item with proper folder structure. 


Conclusion
Finally, I would like to conclude this post, I hope I have been able to help you and justify the topic.


Tuesday, 18 June 2019

Creating an Admin Menu Item On Launch Pad


If you are building a Sitecore admin application, you are going to need to link to them from the Sitecore start screen/launch pad.

To create a menu item on the Sitecore start screen:
  • Log into Sitecore and switch to the core DB.
  • Open content editor and navigate to /Sitecore/client/Applications/LaunchPad/PageSettings/Buttons
  • You will see groupings for each of the sections that appear on the start screen/Launchpad.
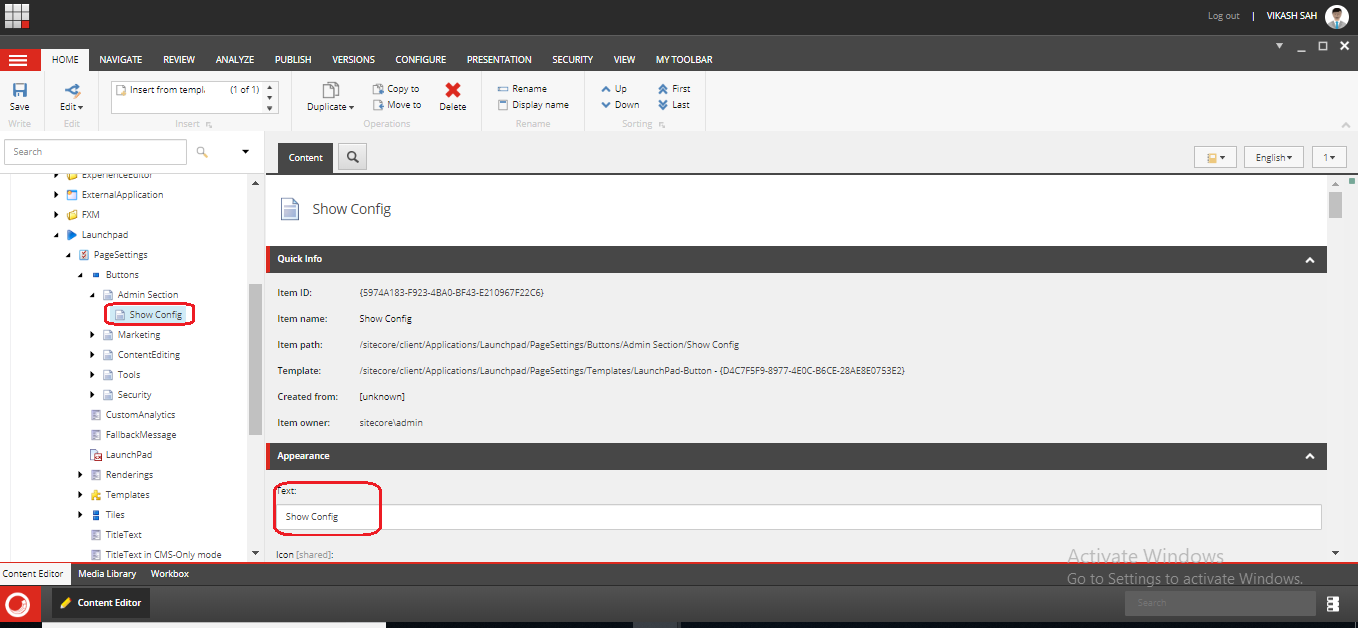
  • Add a new LaunchPad Group using  "/sitecore/client/Applications/Launchpad/PageSettings/Templates/LaunchPad-Group" Template and given Title is "Admin Section" as see the below screenshot.

  • Add a new Launch Pad-Button item to the "Admin Section" section you want it to appear in.
  • Give it a name, icon and link.

  • Your button now appears on the start screen

  • Now you can click on "Show Config" button and show the config file.

Saturday, 15 June 2019

Check SiteCore Items has ALIASES or Not using GutterRender


Aliases to set up shortened URLs for publicity purposes, but they were finding it difficult to manage the large number of aliases they were creating. Their key issues were remembering which pages had aliases defined, and remembering to delete aliases when they removed the pages they were related to.


Sitecore provides a helpful dialogue for managing aliases, in the Presentation ribbon tab:


Custom gutter renderings are classes based on the "Sitecore.Shell.Applications.ContentEditor.Gutters.GutterRenderer" class. All you have to provide is an implementation for the GetIconDescriptor() method:

namespace SitecoreMaster.Models
{
    public class AliasGutterRenderer: GutterRenderer
    {
        private static Sitecore.Data.ID aliasID = new Sitecore.Data.ID("{54BCFFB7-8F46-4948-AE74-DA5B6B5AFA86}");

        protected override GutterIconDescriptor GetIconDescriptor(Sitecore.Data.Items.Item item)
        {
            GutterIconDescriptor gid = null;
            int aliases = 0;

            try
            {
                aliases = Sitecore.Globals.LinkDatabase.GetReferrers(item)
                    .Select(l => l.GetSourceItem())
                    .Where(s => s.TemplateID == aliasID)
                    .Count();

                if (aliases > 0)
                {
                    gid = new GutterIconDescriptor();
                    gid.Icon = "Network/32x32/spy.png";
                    gid.Tooltip = string.Format("This item has {0} alias{1}", aliases, aliases > 1 ? "es" : "");
                    gid.Click = "item:setaliases(id=" + item.ID + ")";
                }

            }
            catch (Exception exception)
            {
                // this should always succeed - exceptions seem to come
                // if link database is out of date
                // In production code, we'd do something cleverer than
                // this and try to prevent rather than catch the exception

                throw exception;
            }
            
            return gid;
        }
    }
}

If we want to visualise Aliases, we need to write some sort of query to detect if the current item has any Aliases attached to it. There are a couple of ways you can go about this. One way would be to write a query for children of the /Sitecore/system/Aliases item and look for references to the current item’s ID in the Linked Item field. But Sitecore can make our life easier than this – since it maintains something called the Link Database for us. Inside the Sitecore database, it maintains references between items. Whenever you fill in a field which stores a link between two or more items this relationship is stored in the Link Database to make it easy to query these relationships later. You can see this data yourself when you click the Links button in the Navigate tab of the ribbon:


You’ll notice that this example page has lots of links in the database table – it references things like templates, sublayouts etc. But it also shows that it is referred to by an Alias item. And that shows us that we can use the Links Database to do the query we need.


Now, what do we need to do to make this custom gutter rendering available for users? The data for configuring the Content Editor UI lives in the Core database, under /sitecore/content/Applications/Content Editor/Gutters and configuring a new Gutter Renderer is as simple as adding a new item here based on the “Gutter Renderer” template:


The “Header” field here contains the text displayed in the right-click context menu we saw back at the beginning of this post. The “Type” field contains the fully qualified .Net type descriptor for the custom rendering class we defined. As usual for configuring extension types, this is formatted as “, ”.

And once you have configured that for your custom class, you can go back to the Master database and enable the new renderer by right-clicking the gutter:


Our new custom gutter render is now visible, and its selected state will be remembered between user sessions. Once it’s selected, we start to see the alias icon in the gutter for any item which has Aliases defined:


And clicking the icon will launch the Aliases dialogue.


Check Sitecore Items Publish or Not using GutterRender


Friday, 14 June 2019

Sitecore Standard Template Fields - Part-7


Sitecore Standard Template: Validators Section

The Validators section of the Sitecore standard template contains the following fields used to configure data validation for the item:
  • Quick Action Bar Validation Rules (N/A): Item validators to apply in the Quick Action Bar.
  • Validate Button Validation Rules (N/A): Item validators to apply in dialogue that appears when a CMS user clicks the Validation button in the Proofing group on the Review tab of the ribbon in the Content Editor.
  • Validator Bar Validation Rules (N/A): Item validators to apply in the Validation Bar.
  • Workflow Validation Rules (N/A): Item validators for the validation workflow action to apply.
  • Suppressed Validation Rules (N/A): Item validators suppressed for this item.

Sitecore Standard Template: Workflow Section

The Workflow section of the Sitecore standard template contains the following fields that control workflow for the item:
  • Workflow (Sitecore.FieldIDs.Workflow): The workflow currently associated with the item.
  • Workflow state (Sitecore.FieldIDs.WorkflowState): The workflow state currently associated with the item.
  • Lock (Sitecore.FieldIDs.Lock): Identifies the owner of the lock associated with the item, preventing other non-admin users from editing that item.
  • Default workflow (Sitecore.FieldIDs.DefaultWorkflow): The workflow into which the system should place versions of the item when CMS users edit it. In general, unlike other fields in the Workflow section, the __Default workflow field should have a value in standard values for the data template associated with the item.

Sitecore Publishing Service 7.0 Installation Guide

  About the Publishing Service module The Publishing Service module is an optional replacement for the existing Sitecore publishing methods....